8. Virtual DJ Deck Controls
Deck Controls are a fundamental component in VirtualDJ that provides the ability to perform both basic and advanced functions. From playing a track and syncing to adding effects and loop rolls, Deck Controls are essential to the art of DJing.
The following sections will go over both Basic and Advanced deck controls:
- Track Info Display
- Basic Controls
- Advanced Controls
- Effects
- Loops
- Pads
- Custom Buttons
TRACK INFO DISPLAY
Once a track is loaded to a deck, the track’s Info such as Artist, Title, Time, and BPM will be displayed in this area. The track will be analyzed and the song position (progress) will be displayed. Depending on what Layout is selected, more complex information and controls will be displayed such as Key, Key Control, Master Tempo, etc.
STARTER

- DECK INDICATOR. The Deck Indicator highlights the current active or working deck. It will switch automatically to the opposing deck when a song is loaded but can also be clicked on manually to bring the preferred deck into focus.
- TITLE AND ARTIST. Displays the title, artist and remix (displayed in brackets if available) of the track according to the tagged information. This information can be modified in the Tag Editor.
- WAVEFORM AND PROGRESS INDICATOR. Displays the track waveform with beat indicator underneath to show breaks, as well as the current position and any cue points or other marked Points Of Interest (see POI Editor).
- TEMPO. This displays the current BPM (Beats Per Minute) of the deck.
- TIME DISPLAY. Displays the remaining time of the track loaded in the deck. Clicking on the Time Display will toggle between Remaining and Elapsed times.
ESSENTIALS

- DECK INDICATOR. The Deck Indicator highlights the current active or working deck. It will switch automatically to the opposing deck when a song is loaded but can also be clicked on manually to bring the preferred deck into focus.
- TITLE AND ARTIST. Displays the title, artist and remix (displayed in brackets if available) of the track according to the tagged information. This information can be modified in the Tag Editor.
- WAVEFORM AND PROGRESS INDICATOR. Displays the track waveform with beat indicator underneath to show breaks, as well as the current position and any cue points or other marked Points Of Interest (see POI Editor).
- TEMPO. This displays the current BPM (Beats Per Minute) of the deck.
- TIME DISPLAY. Displays the remaining time of the track loaded in the deck. Clicking on the Time Display will toggle between Remaining and Elapsed times.
- KEY MATCH MENU. Clicking on the Key Match Menu will provide the ability to change the key (listed in semitones). Click on the desired key to instantly change it.
Selecting Automatic Key Match from this menu will change the key by up to one semitone on the opposing deck when a track is loaded. If the track has a greater difference than one semitone, it will remain unaffected. - KEY DISPLAY. Displays the Harmonic Key of the track. Clicking on the key value will toggle it between the actual Key name (G#) and it’s harmonic value.
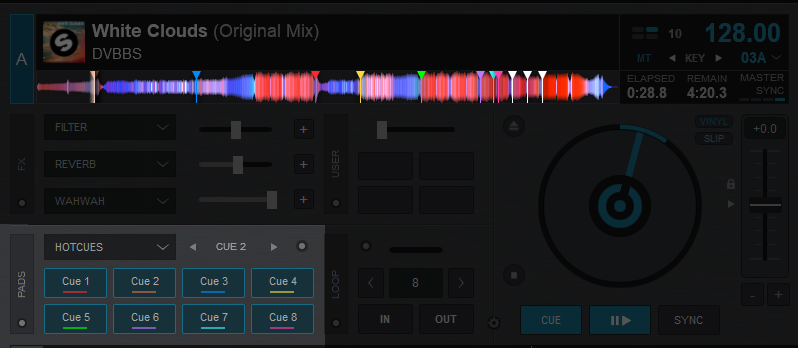
PRO

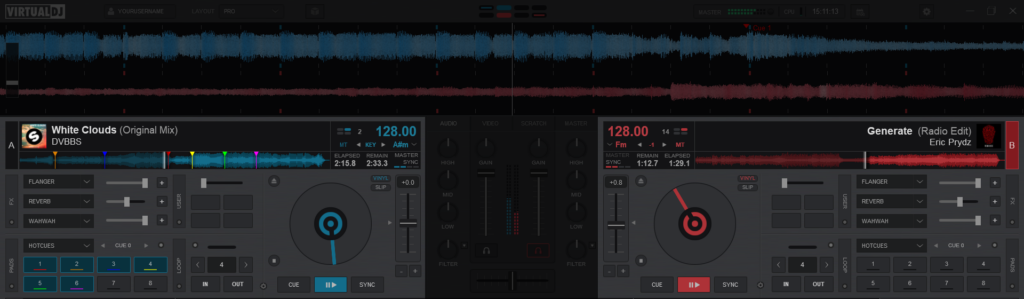
- DECK INDICATOR. The Deck Indicator highlights the current active or working deck. It will switch automatically to the opposing deck when a song is loaded but can also be clicked on manually to bring the preferred deck into focus.
- TITLE AND ARTIST. Displays the title, artist, Cover Art, and remix (displayed in brackets if available) of the track according to the tagged information. This information can be modified in the Tag Editor. Right-clicking on the Cover Art will provide options to open the Tag Editor, BPM Editor, POIs Editor, Lyrics Editor, or Save prepared stems. Dragging a video file onto the Cover Art will link it to the audio file in the deck that can be edited in the Video Editor.
- WAVEFORM AND PROGRESS INDICATOR. Displays the track waveform with beat indicator underneath to show breaks, as well as the current position and any cue points or other marked Points Of Interest (see POI Editor).
- PHRASE INDICATOR AND SYNC. This displays the current Phrase the track is on. Clicking on it will automatically sync the Phrase of the opposing deck.
- TEMPO. This displays the current BPM (Beats Per Minute) of the deck. Clicking on the BPM value will open the Tempo Adjustment Menu in the Title Area:

A)EDIT. Opens the BPM Editor
B)TAP. Click the Tap button to manually calculate the BPM of the track by tapping to the beat 4 times. If the track is stopped, clicking on the Tap button will set it’s current position as the “First Beat” without changing the tempo (shifts phase).
C)CBG ADJUST (%). Adjusts the CBG (Computerized Beat Grid) by 1% increments for fine tuning.
D)CBG ADJUST (beat). Adjusts the CBG (Computerized Beat Grid) by 1 beat increments for quick adjustments.
- KEY MENU. The Key Menu offers 4 functions:
Master Tempo – Indicated by MT will turn the master tempo on or off when clicked.
Smart Key Match – Clicking on the KEY text will instantly match the opposing deck if the key is +/- one semitone. Key adjustment arrows are provided to manually adjust the key outside of the smart range.
Key Display – Displays the Harmonic Key of the track. Clicking on the key value will toggle it between the actual Key name (G#) and it’s harmonic value.
Key Match Menu – Clicking on the Key Match Menu will provide the ability to change the key (listed in semitones). Click on the desired key to instantly change it. Selecting Automatic Key Match from this menu will change the key by up to one semitone on the opposing deck when a track is loaded. If the track has a greater difference than one semitone, it will remain unaffected. - TIME DISPLAY. Displays the elapsed and remaining times of the track loaded in the deck. Clicking on the Time Display will first toggle the elapsed time to the total time, then toggle both time displays to one large display that shows remaining time only.
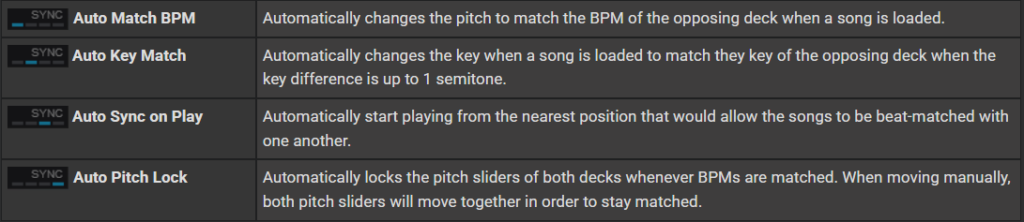
- AUTO SYNC OPTIONS. Opens the Auto Sync Options menu:
BASIC DECK CONTROLS
The Basic Deck Controls are the core function of VirtualDJ. They provide the ability to not only control track playback, but also have key elements that allow you to manipulate the track’s tempo and provide automation to make mixing easier.
Depending on the Skin Layout that is chosen, the Basic Deck Controls differ in appearance but function on the same principles.
- STARTER
- ESSENTIALS
- PRO
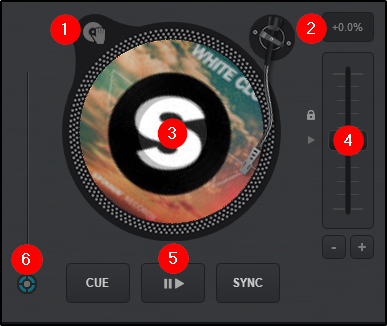
STARTER
- JOG BEHAVIOR. This button provides the ability to switch Jog Wheel Modes:
Vinyl Mode (scratch) In Vinyl Mode the Jog Wheel will emulate the sound of a record being scratched when the position is moved.
CD Mode (nudge) In CD mode the jog wheel will bend the pitch when the position is moved. - MATCH BUTTON. When pressed will automatically match the BPM of the opposing deck.
- JOG WHEEL. The Jog Wheel is used to Scratch or Bend the pitch of the track (depending on which mode is selected) with the use of the mouse, touchscreen, or control surface. The jog wheel also displays the Cover Art of the current track when playing audio files and will display a video preview when video files are being played.
- PITCH SLIDER. The slider is used to increase and decrease the tempo (BPM) of the track by moving it up and down. Clicking on the arrow on the outside center of the slider will gradually reset the pitch. Double-clicking the button will act as an instant reset.
- MIX ASSIST. When activated will snap to the beat of the opposing deck and use other smart mixing aids such as SYNC and KEY MATCH providing that the tracks are compatible with one another.
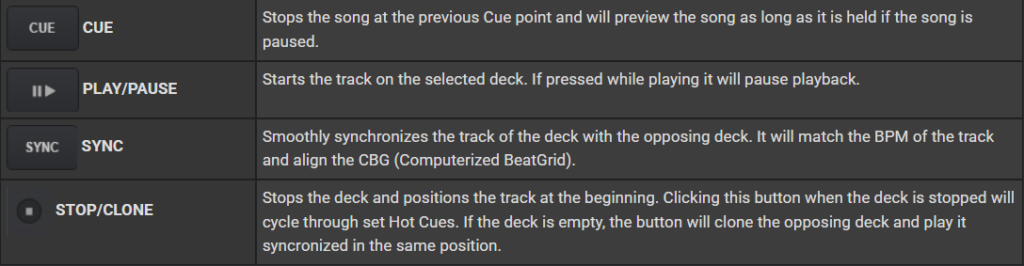
- TRANSPORT CONTROLS.

ESSENTIALS
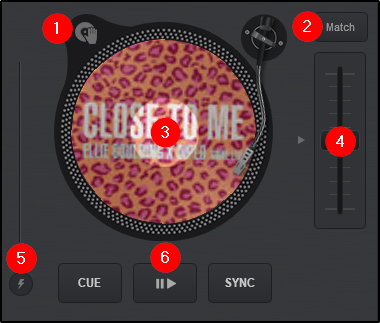
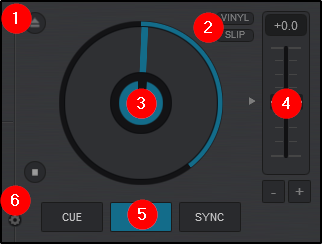
- JOG BEHAVIOR. This button provides the ability to toggle Jogwheel Modes from Vinyl to CD instantaneously.
- PITCH DISPLAY. Displays the pitch value. +0.0 means that the pitch is neutral or unchanged.
- JOG WHEEL. The Jog Wheel is used to Scratch or Bend the pitch of the track (depending on which mode is selected) with the use of the mouse, touchscreen, or control surface. The jog wheel also displays the Cover Art of the current track when playing audio files and will display a video preview when video files are being played.
- PITCH SLIDER. The slider is used to increase and decrease the tempo (BPM) of the track by moving it up and down. Clicking on the arrow on the outside center of the slider will gradually reset the pitch. Double-clicking the button will act as an instant reset.
Pitch Bend buttons (+/-) are offered under the pitch slider to temporary slowdown/speed up the track (Pitch Bend) while pressed. On release the pitch will reset to it’s previous value. - TRANSPORT CONTROLS.

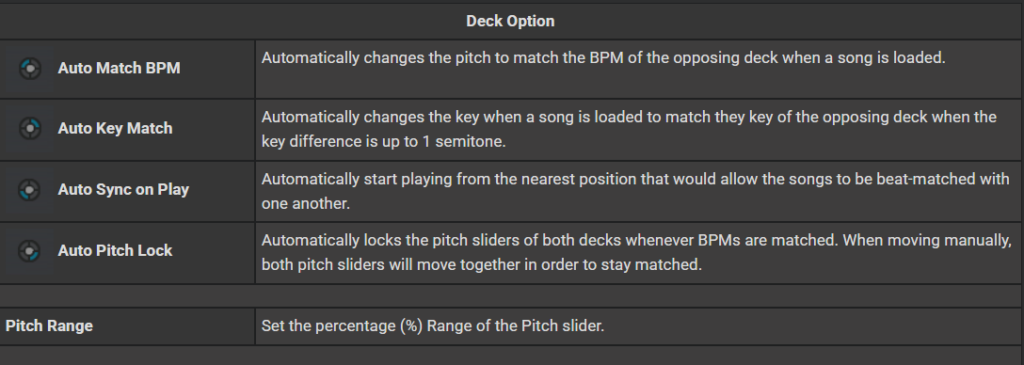
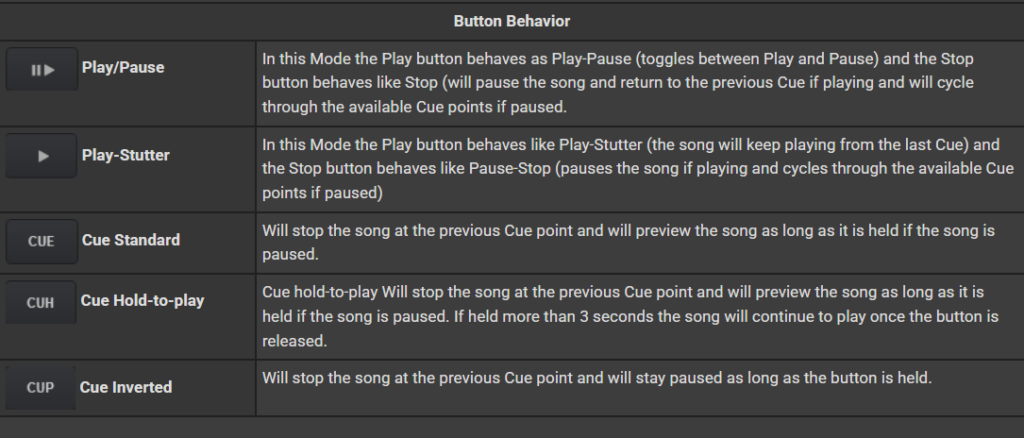
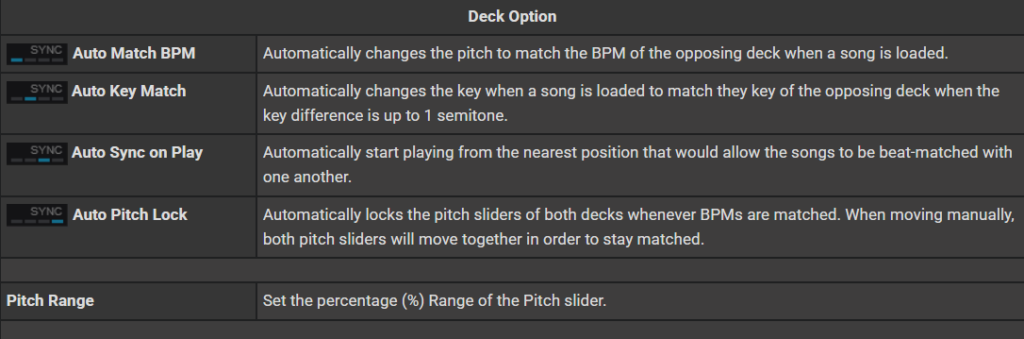
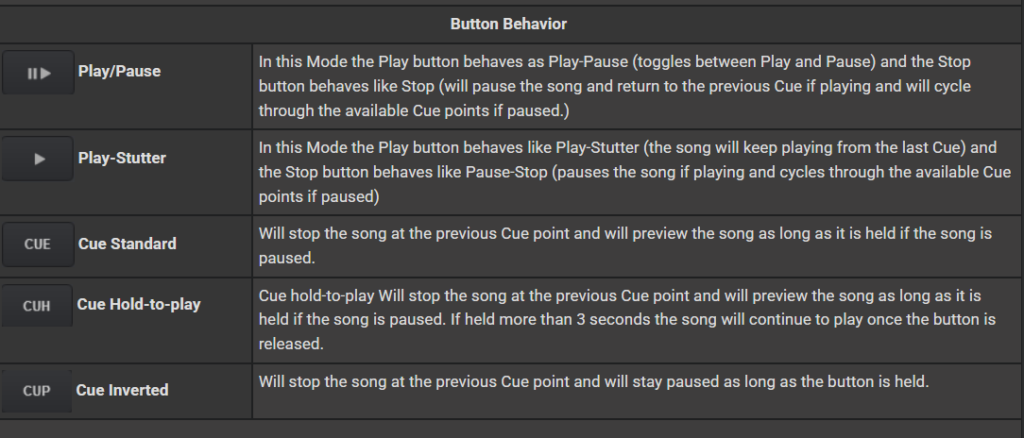
6. DECK OPTIONS. Click on the Deck Options button to choose a different behavior for the Basic Control buttons, adjust the Pitch Range, Jog Wheel mode, and enable/disable Automated features.

PRO
- EJECT/LOAD NEXT. Unloads the deck if there is a track in it. If empty, will load the next track from the browser.
- JOG BEHAVIOR. 2 buttons are offered:
VINYL toggles from Vinyl (Scratch) mode or CD (nudge) mode.
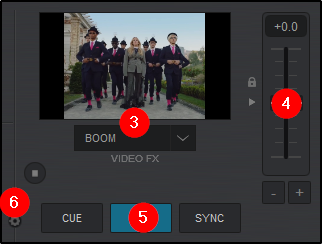
SLIP enables/disables Slip Mode. When enabled, scratch actions, hot cues, loops, etc. will have a temporary effect and the track will continue to play from it’s original position. - JOG WHEEL/VIDEO PREVIEW. The Jog Wheel is used to Scratch or Bend the pitch of the track (depending on which mode is selected) with the use of the mouse, touchscreen, or control surface. The jog wheel also displays the elapsed time of the track around the outer ring.
When a video file is being played and the video mixer is selected, the Jog Wheel turns into a Video Preview window with a Video FX dropdown menu to quickly apply Video FX to the deck. - PITCH SLIDER. The slider is used to increase and decrease the tempo (BPM) of the track by moving it up and down. Clicking on the arrow on the outside center of the slider will gradually reset the pitch. Double-clicking the button will act as an instant reset.
Pitch Bend buttons (+/-) are offered under the pitch slider to temporary slowdown/speed up the track (Pitch Bend) while pressed. On release the pitch will reset to it’s previous value. - TRANSPORT CONTROLS.
6. DECK OPTIONS. Click on the Deck Options button to choose a different behavior for the Basic Control buttons, adjust the Pitch Range, Jog Wheel mode, and enable/disable Automated features.

ADVANCED DECK CONTROLS

Starter Layout
Essentials Layout

Pro Layout
The Advanced Deck Controls section includes Pads to trigger commonly used functions such as HotCues or Samples, as well as Effect, and Loop controls. These features stay grouped together for ease of access and can be found adjacent to the respective deck that they affect.
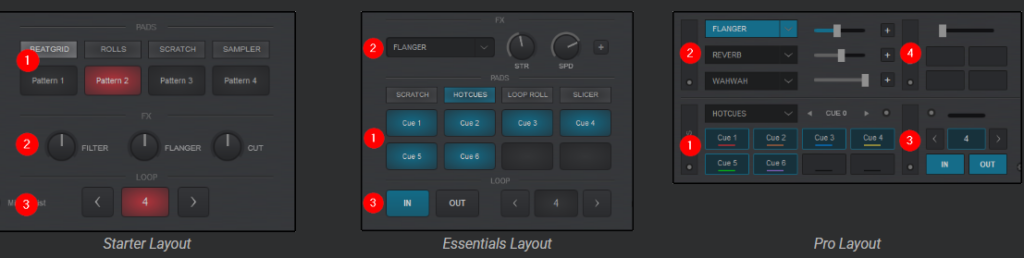
- PADS. Each Layout offers a Pads section that has a unique look and functionality. Pads are useful to trigger common functions in the software and work especially well when paired with a controller that offers pads.
- FX. Effects provide the ability to add additional sound variances to each deck. The complexity and customization of the FX panel changes with each layout.
- LOOP. The loop controls of VirtualDJ are as simple as a single press of a button. All layouts offer easy to use looping tools with progressively added complexity as the layout changes.
- USER (Pro Layout). The User Control Panel provides Pro Layout users the ability to add additional functionality to the layout such as Custom Buttons, control and monitor Line-In or Timecode inputs, or to simply duplicate a common core functionality of the software that requires more real estate on the GUI.
Effects
VirtualDJ offers the ability to apply a variety of Effects to a specific deck as well as the Master Output (see Master Panel). A large selection of effects are included in the software and can be accessed in different layouts.
For a complete list of native effects included with VirtualDJ,
STARTER
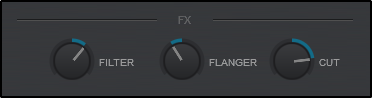
The Starter Layout offers a simple 3 dial FX Panel. Moving the dials left or right will increase or decrease the strength of the effect. Double clicking on the dial will turn off the effect returning it to the 12 o’clock position.
3 effects are offered: Filter, Flanger, and Cut. These effects cannot be changed in the Starter Layout.
ESSENTIALS
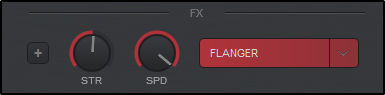
The Essentials Layout offers a Single FX panel. In this view, a single effect slot is offered with 2 parameter dials and a button to open the effect’s Graphical User Interface in the SideView area of the browser.
Clicking on the effect name will trigger the desired effect, while clicking the dropdown arrow will open the FX menu providing the ability to select one of the many other effects available.
PRO
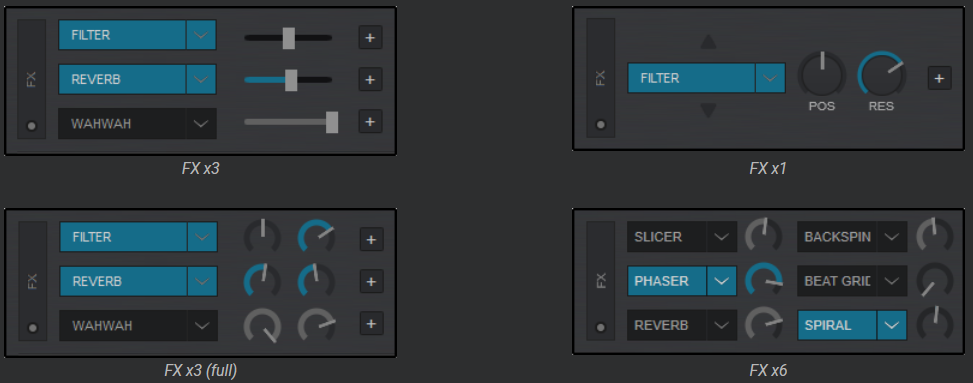
The Pro Layout offers multiple effects panel configurations that can be selected and toggled from the FX Toggle button. Regardless of the layout chosen, the FX panel works identical by clicking on an effect to activate it, using the dropdown beside the effect name to select different effects, and using the buttons to open the effect’s Graphical User Interface in the SideView area of the browser.
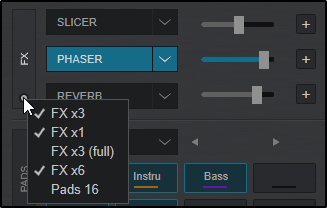
Clicking on the View Selection button inside the FX Toggle will provide the 5 different available views: FX x3, FX x1, FX x3 (full), FX x6 and Pads 16 (if you wish to display 8 additional pads instead of the FX panel).
As many of these views can be selected (marked with a check mark) to toggle through each look quickly by using the FX Toggle button.
USING EFFECTS
Once the Effect select button is pressed, an Effects Selection list will be displayed to easily scroll through all the available Sound and Video Effects to make your selection. The Full Effects Group is displayed by default, clicking the left and right icons on either side of the FX List will rotate through Full, Pioneer, Rane, Legacy, Default, and Video FX lists.
Click on the Pin icon to the right of Sound Effects to keep the Effect Selection list visible (pinned) after effect selection if required.
Once the Effect is selected it can be activated by clicking on the effect name in the Deck Effect Panel or in the Effect Selection List by clicking on the Activate Button to the left of the desired effect.
Multiple effects can be triggered from the Effect Selection list simultaneously regardless of the number of Effects visible in the Deck Effect Panel.
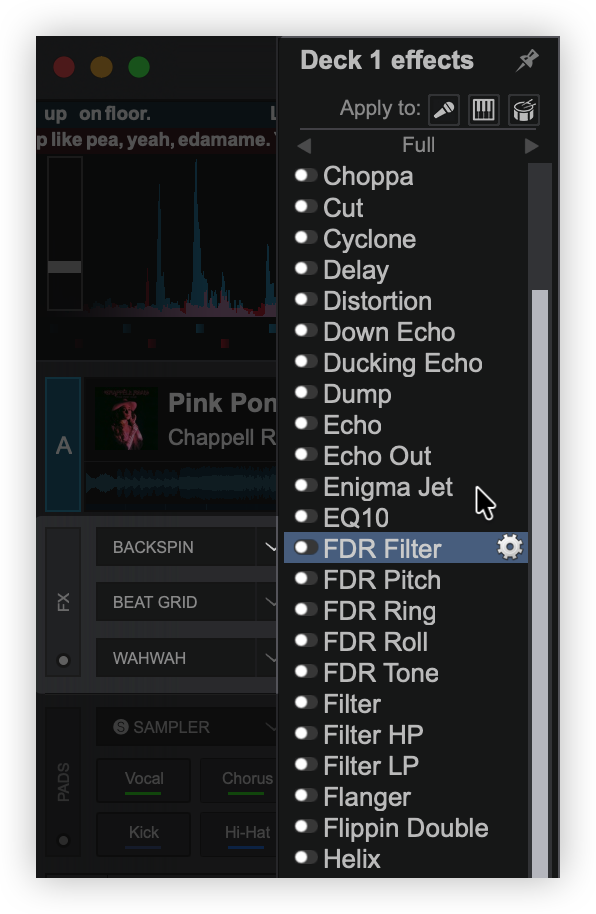
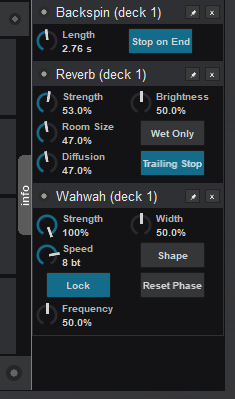
Clicking on the button in the Deck Effect Panel (if available) or the gear icon to the right of each effect in the Effect Selection List will open the GUI for the desired Effect and dock it to the lower right of the software interface beside the Info Panel.
The Effect can then be unpinned by using the Pin icon on top of the Effect GUI so that it can be re-positioned to anywhere on the screen for greater customization and ease of use. Clicking on the X will close the Effect GUI regardless of it’s position but will not deactivate the effect.
Some effects can be used post-fader providing that the hardware being used supports it.
EFFECTS ON STEMS
Effects can be applied to Stems directly by toggling the STEMS FX Pad on the Stems Pad Page.
The Pad is toggled through 3 Stem FX modes; Vocal, Melody, or Rhythm.
When Stem FX are enabled for a specific stem, the effect will only be applied to that Stem and not the entire track.
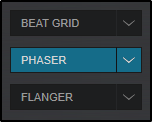
Stem FX can also be applied from the FX Dropdown Menu. At the bottom of the FX Menu, the ability to toggle through 3 Stem FX mode buttons is available for Vocal, Melody, or Rhythm.
When Stem FX are enabled a small S icon will appear next to the effects providing visual feedback that the effects will only be applied to the stem chosen.
Stem FX Enabled
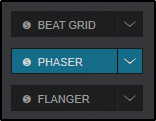
Stem FX Disabled
MANAGING AND GROUPING EFFECTS
VirtualDJ offers the ability to organize all effects into lists for easier access using the Audio Effects List Editor.
Scroll to the bottom of the Effects List and click on More… or Manage… (depending on the list displayed) to open the Editor.

The Audio Effects List Editor will open to add and remove effects in the available lists, create new lists, and/or delete lists.
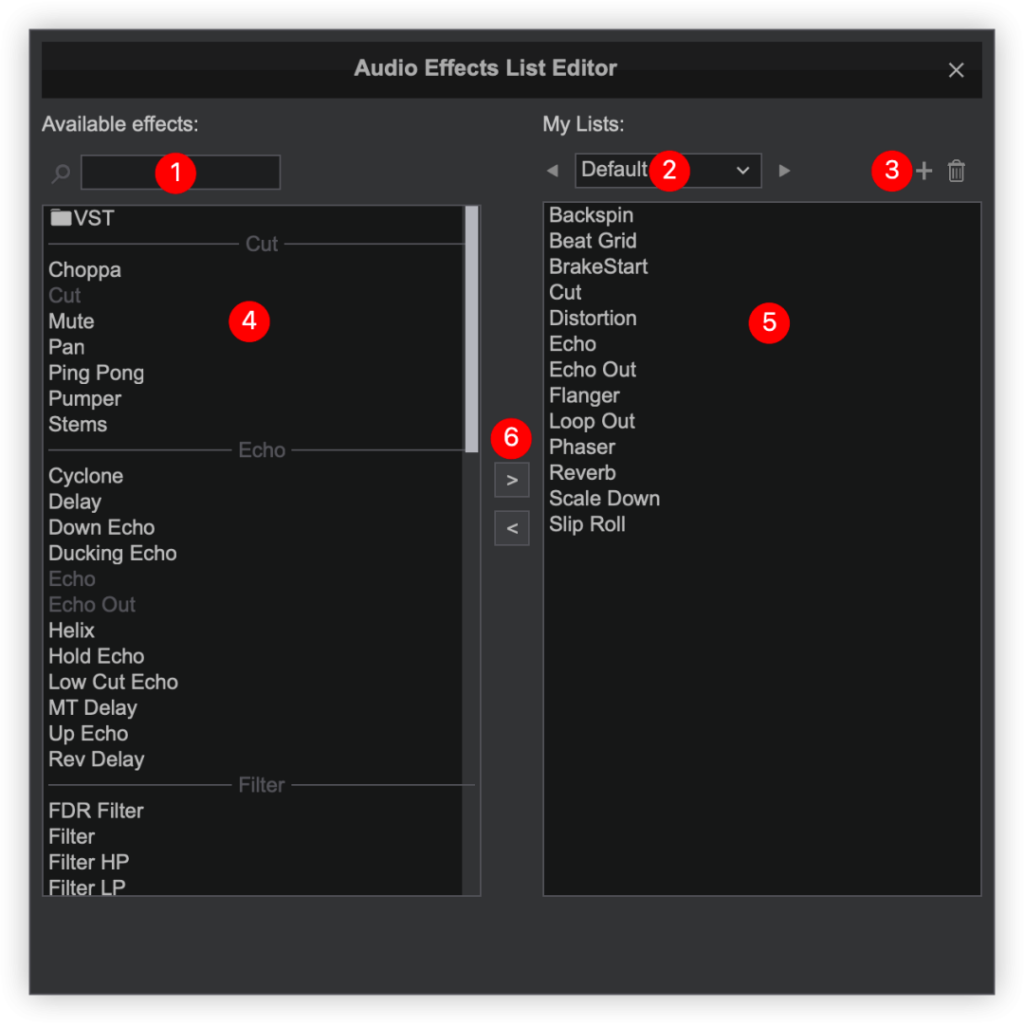
- EFFECT SEARCH BAR. Searches available effects to quickly add to the current list.
- CURRENT LIST. Displays the current list being edited. Clicking the left and right arrows will cycle through the available effects lists. Selecting the dropdown arrow will display all lists with the option for New… which will create an empty list.
- LIST ADD/REMOVE. Clicking on the button will create a new empty list. Clicking the trashcan will ask to delete the current list. Clicking YES will delete the list only and not the effects.
- AVAILABLE EFFECTS. Displays all available effects categorized by style. When using the Effect Search Bar, the effects that do not match the search query will disappear. Effects that are white are available to add to the current list while effects that are greyed out are already in the list being edited.
- CURRENT EFFECTS. Displays the effects that are in the current list. Effects in this list can be dragged and dropped to re-order the list based on user preference.
- EFFECT ADD/REMOVE. Clicking on an effect from the Available Effects list and then clicking on the button will add it to the current effect list. Clicking on an effect from the current list and clicking on the button will remove it from the current list and add it back to the available effects list.
VST EFFECTS
Virtual Studio Technology (VST) is a software interface created by Steinberg that integrates software audio instruments (VSTi) and effect plugins with audio editors, hard-disk recording systems and dj-ing applications. VST technology uses digital signal processing to simulate traditional hardware in software. Thousands of plugins exist, both commercial and freeware.
VirtualDJ supports VST and VSTi effect plugins. These are usually simple .dll files that come zipped in a file to facilitate download through the internet.
Installing and using VST effects
Windows: Extract and copy the .dll file of the VST to the sound effects folder of VirtualDJ (\Users\YourUsername\Documents\VirtualDj\Plugins\SoundEffect)*.
Mac: Install the .dmg file to your computer. Open the contents of the file and find the .vst file that you wish to install. Copy the file and paste it in the effects folder (\Documents\VirtualDj\Plugins64\SoundEffect)*. Once pasted into the folder rename the “.vst” extension to “.bundle“. This is necessary for VirtualDJ to recognize the VST.
*On newer installations, VirtualDJ no longer uses the Documents folder to store data. The new home folder locations are as follows:
\Users\YourUserName\AppData\Local\VirtualDJ
\Users\YourUserName\Library\ApplicationSupport\VirtualDJ
Alternatively, if you already have VSTs installed in a folder on your computer, you can point VirtualDJ to their location by going to OptionsvstFxFolder and selecting the folder where your VSTs are located.
After that your Effect will be listed along with your other effects and you can select and use it like the default ones. A restart of the software will be necessary if the VST was installed while the software was open.
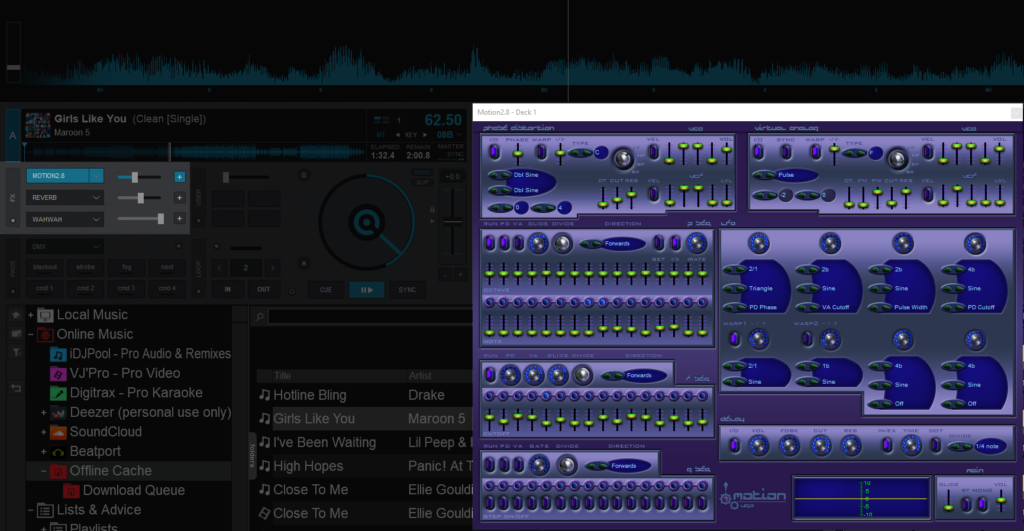
VST Effects usually provide their own GUI. Use the + button from the skin or the settings icon from the Effects List, to get a floating window with the effect’s interface.
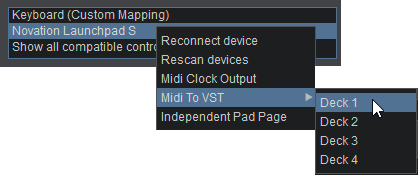
MIDI devices such as MIDI Keyboards can be set up to control VSTs through a deck. Right clicking the device in the Controller settings will bring up an option for MIDI to VST. You can then select which deck the VST will be controlled by the device when it is activated.
This setup is pass through. Mapping for the device is handled by the selected VST (if offered).
Loops
A Loop is a small section of a media file that repeats continually. VirtualDJ provides a complete set of looping tools to quickly and easily select, execute, save and record Loops.
STARTER
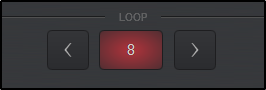
In the Starter Layout the Loop panel offers just the basics. The size of the loop is displayed (number of beats) in the center and when clicked on, engages/disengages an automatic loop. Clicking on the arrows to either side of the loop button will decrease the loop by half or increase it by double it’s size.
ESSENTIALS
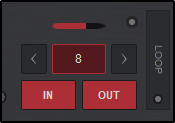
The Essentials Layout offers basic looping tools with some added functionality. The size of the loop is displayed (number of beats) in the center and when clicked on, engages/disengages an automatic loop. Clicking on the arrows to either side of the loop button will decrease the loop by half or increase it by double it’s size.
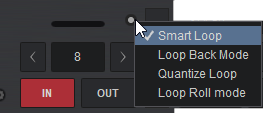
Additionally, Loop IN and Loop OUT buttons are available to set the entry and exit points of the Loop (Manual Loop) as well as a Loop Options button to change looping behavior.
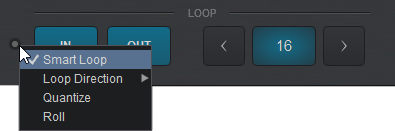
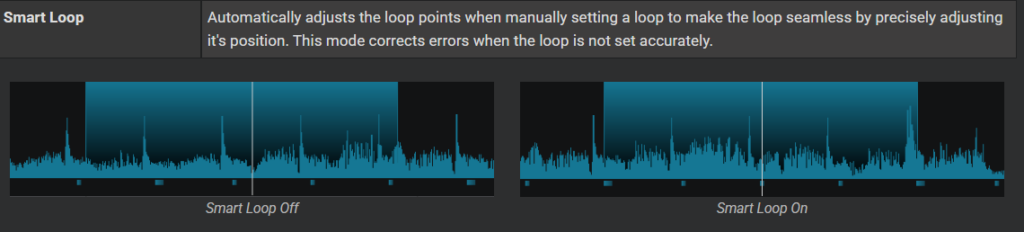
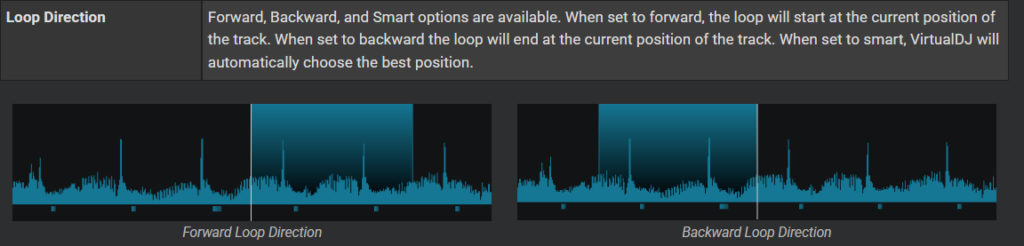
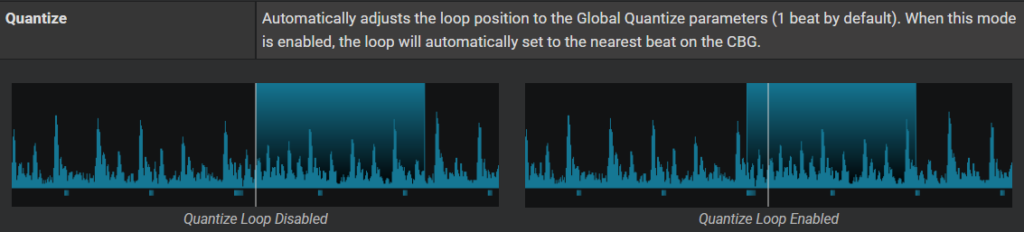
Clicking on the Loop Options button provides a menu of different options that can be enabled or disabled quickly and easily.
For each option that is enabled a check mark in the options menu will indicate it’s status:

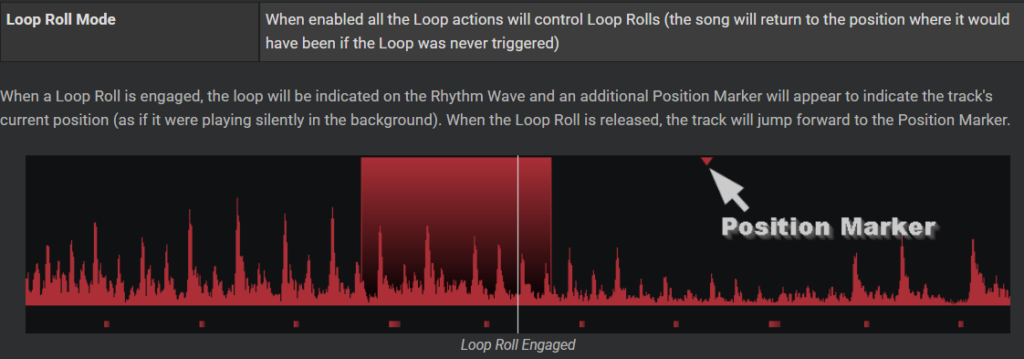
When a Loop Roll is engaged, the loop will be indicated on the Rhythm Wave and an additional Position Marker will appear to indicate the track’s current position (as if it were playing silently in the background). When the Loop Roll is released, the track will jump forward to the Position Marker.

Loop Roll Engaged
PRO
The Pro Layout offers multiple loop panels that can be toggled via the vertical LOOP header (loop toggle) button. It offers basic loop functions as well as more complex looping tools that Professional DJ’s require.
Clicking on the View Selection button inside the Loop Toggle will provide the 5 different available views: Loops (main), Loops Adjust, Saved Loops, Loop Record, and Loop Direct. Any selected view will be marked with a check mark and will display in the toggle rotation when pressed.
loops (main)
The main view is auto-selected by default. In this view, Loop IN and Loop OUT buttons are available to set the entry and exit points of the Loop (Manual Loop). Use the left and right buttons to half or double the size of the loop.
The size of the loop is displayed (number of beats) which can also be clicked on to engage a loop (Auto Loop) along with a progress bar displaying the loops current position.
A Loop Options button is also provided to change loop settings. Clicking on the Loop Options button provides a menu of different options that can be enabled or disabled quickly and easily.
For each option that is enabled a check mark in the options menu will indicate it’s status:

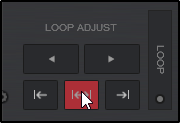
loops adjust
The Loop Adjust panel provides the ability to move the entire loop left or right without changing it’s size or to modify the loop’s IN and OUT points.
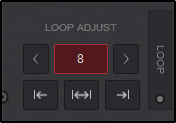
When a loop is enabled, clicking on any of the Loop Adjust buttons will provide an additional set of buttons (left and right arrows) to finely tune the loops position in the track.

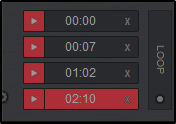
Saved Loops
The Saved Loops panel displays any saved loops that the loaded track has as well as allows you to create and delete saved loops. Clicking the play button will trigger a saved loop, or if the slot is empty will create a 4 beat loop* and save it to the slot. Clicking on the X will delete the saved loop.
Saved loops can also be created, deleted or edited in the POI Editor.
*The default loop size can be changed in settings by changing the value in loopDefault
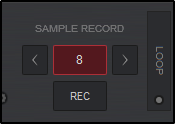
loop record
The Loop Record view offers an Auto Loop button which displays the number of beats, and left and right buttons to half or double the size of the loop.
When a loop is active (can be paused) the REC button will record the loop and save it to the Sampler Recordings folder. If no loop is active but the track is playing, it will record the duration of the track until the REC button is turned off.
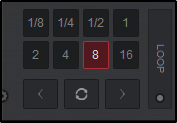
loop direct
The Loop Direct view displays 8 of the most popular loop sizes for loops and loop rolls. Clicking on any of the loop buttons will trigger a loop of the corresponding size. Loop Half and Loop Double buttons (arrows) can be used to increase or decrease the loop size outside of the available buttons, but are not displayed.
An additional Reloop button is also available in this view which will trigger the last loop used.
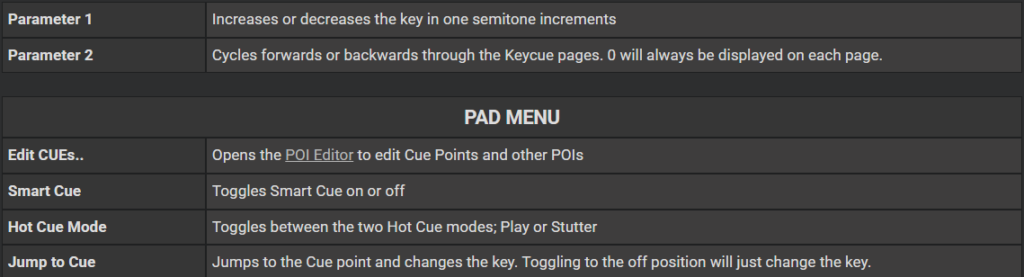
Pads
Pads are a dynamic way to quickly access and trigger commonly used functions. On each deck is a set of pads that can be used to trigger various built in functions as well as customized ones, depending on the Layout chosen. VirtualDJ offers a wide selection of default pages, but more pages can be added if required in the Pads Editor.
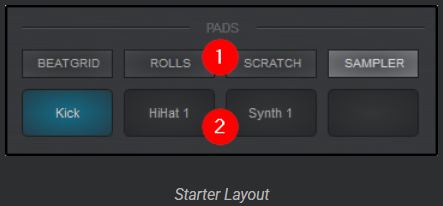
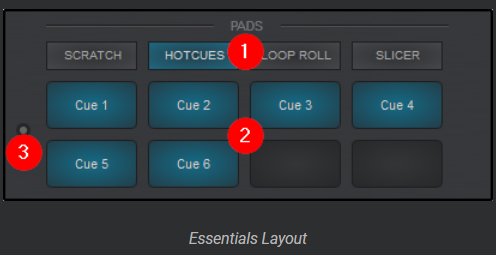
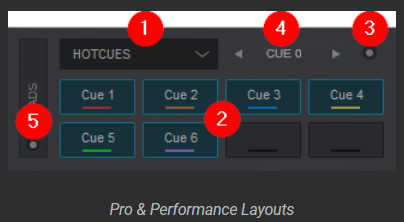
- PAGE. Displays the Pad Page selection which differs in each Layout:
Starter Layout. Pages are static and can not be altered.
Essentials Layout. Pad pages are displayed in a Button style view. Right clicking on any Pad Page will display a menu to select other pages or Edit… to open the Pads Editor.
Pro Layout. Pads are displayed in a drop-down style view, but can be switched to a Button style view by clicking on the Pads Toggle. Clicking on the drop-down arrow to the right of the Pad Page selection will display a menu to select other pages or Edit… to open the Pads Editor. - PADS. Clicking on the pads will trigger the specified action for that pad and page combination. A right-click(shift) on any pad will trigger an alternate action if the pad is also mapped with a shift command (See Pads Editor).
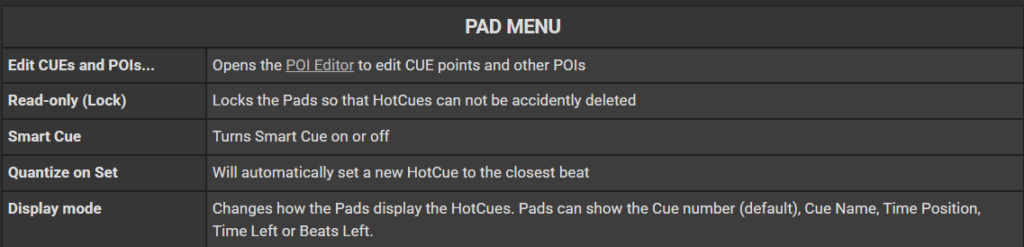
- PADS MENU (Essentials & Pro Layouts). Each page offers an optional Pads Menu that provides different options for the specified page. Not all pages offer a default menu, but can be added in the Pads Editor if required.
- PARAMETERS (Pro Layout). Each page offers 2 parameters that are displayed (if they have been set for the specified page) and can be cycled with the left and right buttons. Hovering a mouse to each side of the parameter will display the button for the desired parameter. Clicking on either button will cycle the specified parameter.
- PADS TOGGLE & SELECTION (Pro Layout). Clicking on the toggle will change the view from a drop-down style to favorites style display. Clicking on the selection button in the toggle provides the ability to enable or disable these views.
Pad Page Controller Assignment
If a controller is connected to VirtualDJ, the Controller name will be displayed in the Page Menu and it will display the various pages assigned to the page buttons on the device. While hardware devices usually have a predefined silk screen for various pad functions such as Hot Cues, Samples, Loops, etc; VirtualDJ provides the ability to change these Pad Page modes directly from within the software in order for you to customize the hardware layout.
Depending on the number of Pad Page buttons on the device, VirtualDJ will display the number of pages available as well as Shift button actions in order to double the total number of pages available.
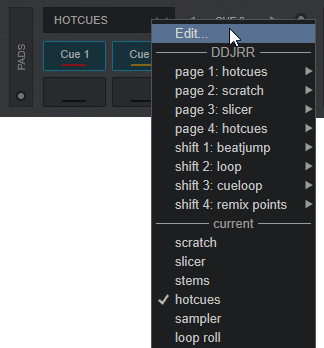
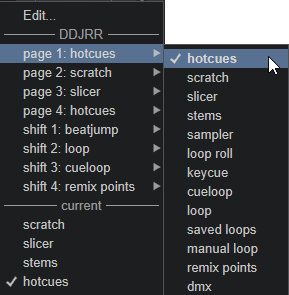
To assign a different function to a Pad Page, click on the Page drop down and hover over the Page number or Shift page number that you’d like to alter.
All available page assignments will display from the icon of the selected page. Click on the page you wish to replace from the menu. A check mark will indicate which page has been selected and the name of the page will automatically change for easy reference.
*Note: Some page assignments are not available on certain controllers due to being locked by the manufacturer. If a page is locked, the icon will not be displayed.
16 Pad Mode (Pro Layout)
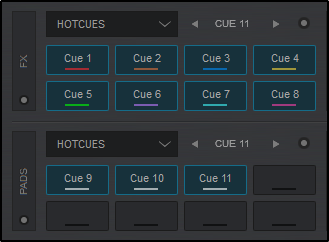
f a controller with 16 pads is connected to VirtualDJ, the FX panel will display pads 1 – 8 while the Pads panel will display pads 9 – 16 in order to keep the Pads display in order. Clicking on the FX toggle will restore the FX view and move pads 1 – 8 back to the Pads panel.
Additionally, if a 16 Pad controller is not connected but you wish to access 16 Pads Mode on VirtualDJ’s GUI you can go to the View Selection button inside the FX toggle and select Pads 16.
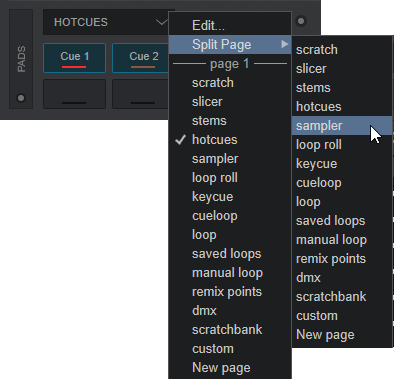
Split Pages
Split Pages provide the ability to combine 2 pad pages for easy access. The top row and Parameter 1 are dedicated to the first page, while the second row and Parameter 2 are dedicated to second page or split.
To create a Split Page be sure you are on the initial page that you wish to split and click on the drop-down menu. Select Split Page and select the 2nd page that you wish to take the position of the lower pads.
This also works on most controllers by holding the first pad mode button and then pressing the second one. Please consult the Hardware Manual for your device.
* Split Pages are not available when 16 Pad Mode is selected.
DEFAULT PAGES
HOT CUES
Hot Cues are flagged locations in a track that can be jumped to instantly on the fly. This gives the DJ the ability to jump to any position in the song without disrupting the audio. VirtualDJ displays 8 available Hot Cue slots in the Pads display by default, but also provides the ability to create and store an unlimited number of Hot Cues per track.
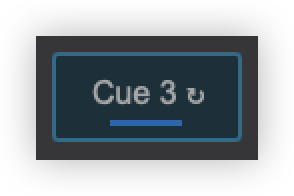
The HotCue page will display and store any HotCues that have been specified for the loaded track. Left clicking a Hot Cue Pad will set the Cue if no Cue is available and will trigger the Cue if it already exists. Right clicking (shift) a pad will delete the Hot Cue.
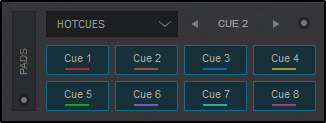
If a HotCue is set while a loop is active it will create a Saved Loop on the HotCue Pad Page and display a loop icon on the Cue to indicate that it is in loop mode.
HotCues can be managed in the Pads Editor and POI Editor.

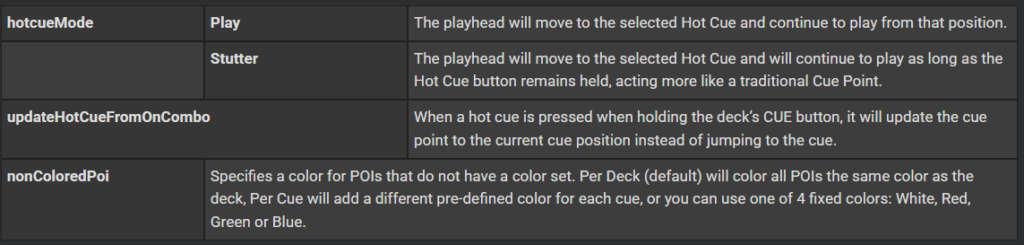
Hot Cues also have various settings to alter their behavior or performance. These settings can be adjusted in the Options Menu:

*Note: Even though 8 Hot Cue points are offered in the Default GUI (which should cover the needs in most cases), VirtualDJ supports unlimited Hot Cue points which can be controlled using a custom skin, custom buttons, or keyboard/midi controller shortcuts.
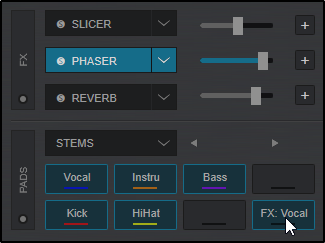
STEMS (64 Bit versions)
The Stems page provides the ability to instantly use Acapellas and Instrumentals, or mute Vocals, Instruments, Bass, and Drums (Kick and HiHat) from the actively playing track in the deck in order to create remixes and/or mash-ups on the fly.
Clicking on a pad will remove the audio of the selected pad, while right clicking (shift) a pad will isolate the vocal or instruments.
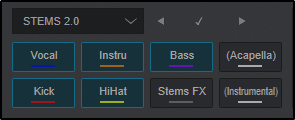
Additionally, effects can be applied to individual stems by toggling the Stems FX Pad. More information on Stems FX can be found on the Stems FX section of the Effects page.

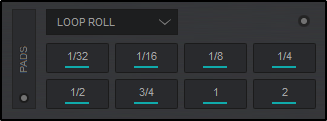
LOOP ROLL
The Loop Roll page provides the ability to instantly create a loop roll by a specified number of beats while the pad is held. Releasing the pad will allow the track to continue from the place that it would have been in as if no loop was triggered.
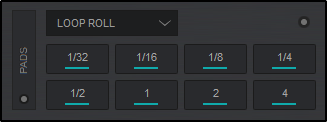
Right clicking (shift) a pad will offer an additional size (¾) which will move the 1 and 2 beat selections to the right. 4 beats is removed.

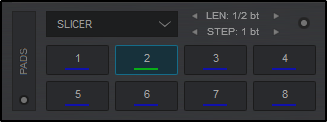
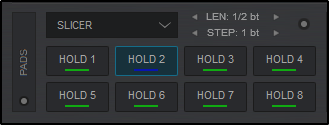
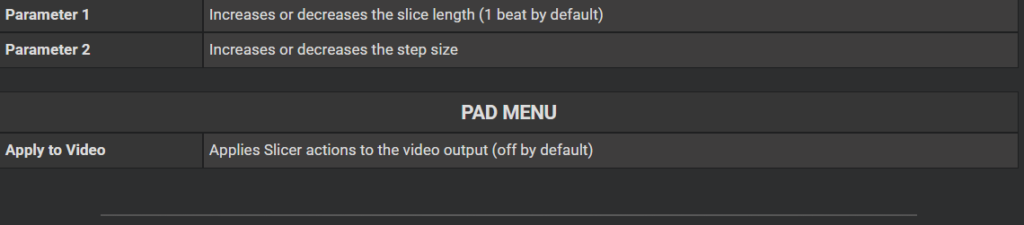
SLICER
Slicer provides the ability to slice up a track similar to a loop roll. The track is divided into 8 steps (1 beat by default) that move along with each beat (step) of the track. Pressing each Pad will loop (slice) the last displayed step. When the pad is released, the track will continue to play from the position that it would have been in as if nothing happened at all.
Right clicking (shift) the pads will provide Slicer Hold mode. This memorizes the Slice so it can be easily returned to at a later point without disrupting the tracks current position.
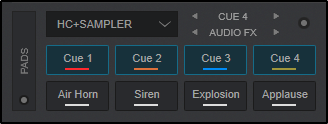
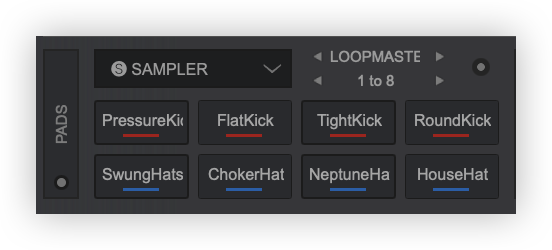
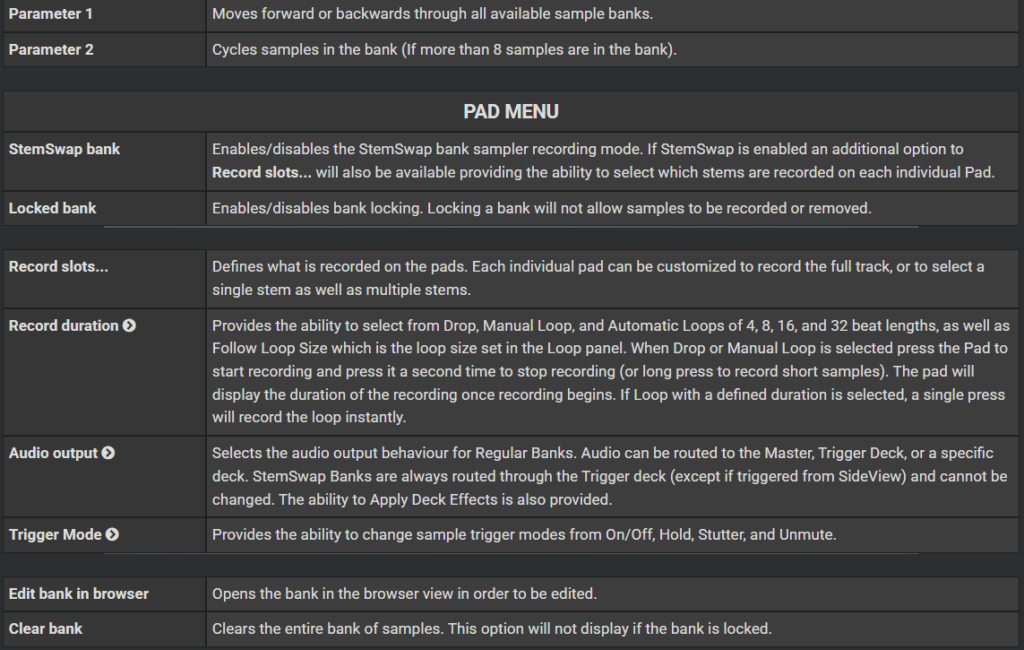
SAMPLER
The Sampler page will display the first 8 pads of the active sample bank. Clicking on a Pad will start/stop the selected sample, while right clicking (shift) will stop a triggered sample.
If the pad is empty, clicking on it will record a StemSwap sample (or regular sample if StemSwap Bank is unchecked) that can be used immediately with the playing track and will swap the corresponding stems playing in the deck with the sample’s stems. Sample recording behaviour can be changed in the Pads Menu.
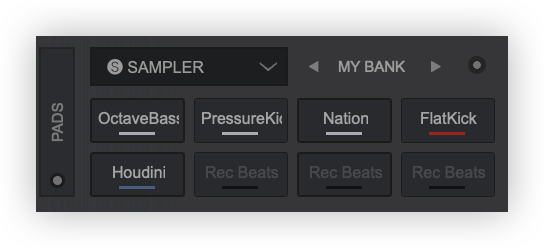
If a sample is not playing, it can be removed directly from the pad by using right-click (Shift+click). The option to lock the bank is provided in the Pads Menu to disable recording and deletion.
When using a Shift action the Pads will display Parameter 2 (if 8 or less sample pads are being used) without changing the Pads displayed.
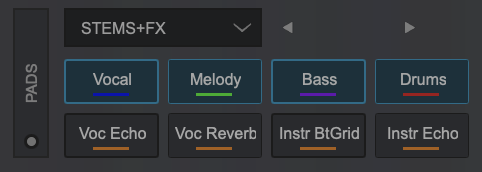
STEMS+FX
Stems and effects can be used together by using the dedicated Stems+FX page. The top 4 pads display stem separation for vocals, melody, bass and drums. The bottom 4 pads display the effects for vocals and instruments. Vocal Echo, Vocal Reverb, Instrument Beat Grid, and Instrument Echo are provided to quickly add an effect to the stem only.

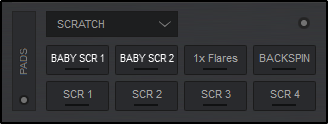
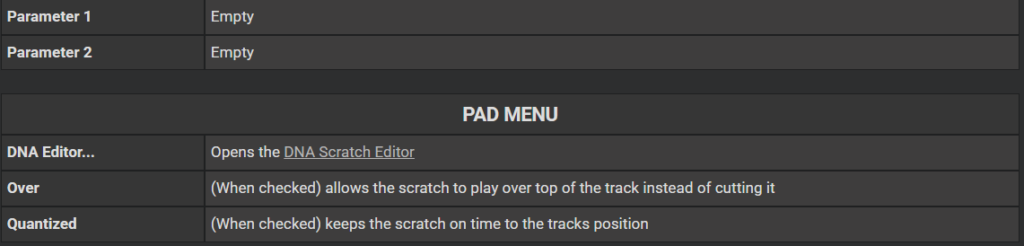
SCRATCH
The Scratch Pad page provides the ability to instantly trigger an automated, pre-defined scratch in a single step. Each Pad will trigger a different scratch variation that will play without disrupting the beat grid of the track, giving you the ability to experiment with different scratch sounds while keeping the music flowing.
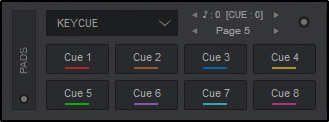
KEYCUE
The Keycue page provides the ability to instantly trigger the selected Hot Cue and change it’s key in a single step. Each Pad will trigger the same Hot Cue but in a different key and the track will continue to play in that key until the key is reset or any Hot Cue is triggered at the zero value. Each Keycue pad displays it’s value in semitones.
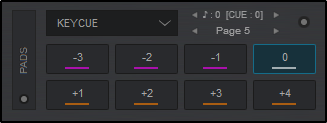
Right clicking (shift) a pad will display the available Hot Cues that have been set. The preferred Hot Cue can then be selected to be used on the main Pads.
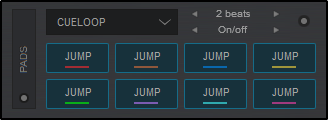
CUELOOP
CueLoop provides the ability to set and loop cue points instantly. A single click will set a cue point if no Cue point is set, while holding the button will set the cue point and loop it for the specified length of the parameter. If a Cue point is already set, a single click will jump to the specified Cue and set a loop-in point that can be manually set to loop out.
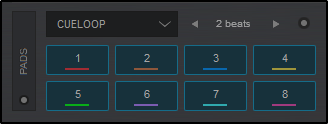
Right clicking a CueLoop will jump to the Cue position and loop from that point.

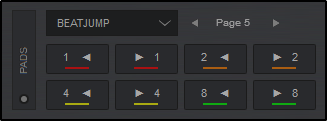
BEATJUMP
The Beat Jump page provides the ability to jump forward/backwards by a specified set of beats.

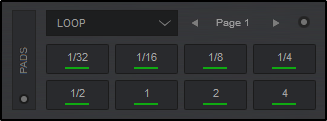
LOOP
The Loop page is an alternative to the Loop panel and provides the ability to instantly set a loop by a specified set of beats.

SAVED LOOPS
The Saved Loop page will display and trigger any saved loops that you have created in the POI Editor. Clicking on an empty slot will save the loop to the pad and engage it, while holding a Pad will delete the saved loop. Once a loop is saved to a slot, left clicking will activate the Saved Loop but will not jump to its position if it’s later to the track’s current position (load-prepare).
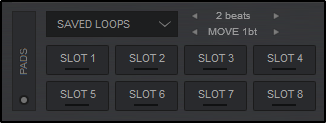
Right clicking (SHIFT+Pad) will jump and engage any saved loops regardless of the play marker’s position.
*Note: Only one Saved Loop can be active at a time.
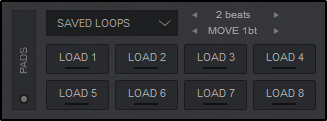
Saved Loops can be managed in the POI Editor.

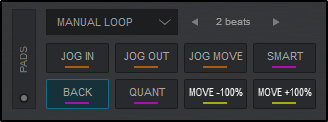
MANUAL LOOP
The Manual Loop page provides the most commonly used loop controls (see Loops), to set an In and Out point as well as adjust the size and position of the loop.
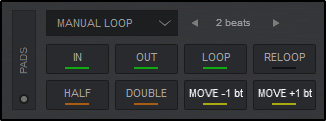
Right clicking (shift) the pads will give additional loop controls to adjust an enabled loops IN or OUT point as well as Move the entire loop with the use of the Jogwheel. Smart Loop, Loop Back and Quantize modes can be toggled on and off, and the entire loop can be moved forward or backwards by 100%.

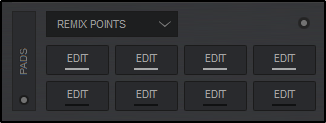
REMIX POINTS
The Remix Points page offers all available Remix Points that have been either automatically analyzed by VirtualDJ or created in the POI Editor. Clicking on an empty pad (N/A) will add a Remix Point to the tracks current position. Remix points are managed in the POI Editor.

Right clicking (shift) the pads will display 8 EDIT Pads for each Remix Point. Clicking on the pad will open the POI Editor at the Remix Point selected.

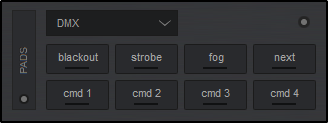
DMX
The DMX page allows you to connect DMX controlled lighting systems that function on the OS2L protocol.
For complete details on OS2L and how to connect, please see our OS2L – DMX Control Guide

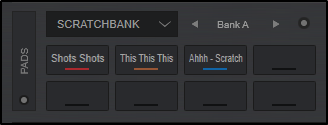
SCRATCHBANK
The Scratchbank page allows you to quickly access your favorite scratch samples and tracks instantly. You can drag and drop any file from the browser onto an empty pad to load the bank, or simply click on an empty pad to open the Scratch Bank Editor and load the file from the editor page.
Clicking on a pad will load the scratchbank pad to a deck. Right clicking or Shift+Click will unload the deck and revert to the previously loaded song that was originally in the deck before any of the Scratchbank Pads were loaded.

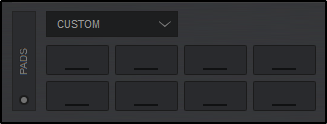
CUSTOM
In order to cover all possible needs, features and actions, VirtualDJ has Custom Buttons as one of the Pads pages. This adds extra empty buttons and parameters to customize (via VirtualDJ script actions) any additional functions that may be individually needed but are not present in the Interface. By default, Custom Buttons remain blank but can be added in the Pads Editor.